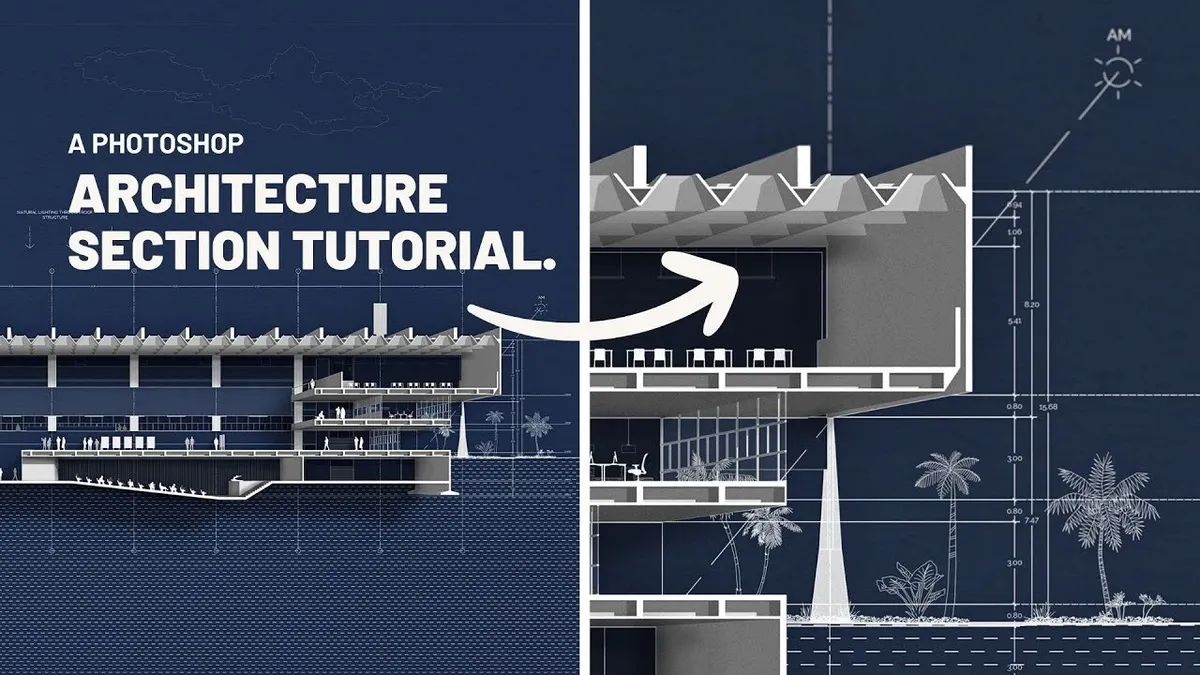
How to create a perspective section in Photoshop


In this video I want to show you how to create this perspective section effect using mostly, photoshop. This is part of our Master Sections course which we released a few years ago and I love this technique so much that I wanted to create a video around it. In the course we also see how to create these other two sections but more on that later, lets start.
References
First, references, we always start with reference images, and for this section, I looked a lot at the Renzo Piano style sections. Where you can see the blueprint style where there is a blue background, and white linework. But also, there is a very technical feeling to the section, it-s also very informative. It has dimensions as well as important information about the building.

Access the Master Sections course with a 20% discount!
""


Create a section in Sketchup
Even though the majority of this image is going to be done entirely in photoshop, we do need a 3d modeling program to export our base section and our base images. In this case I am working on SketchUp and AutoCAD, but if you use other 3d modeling programs like Revit or rhino you can also do the same. If you already have this part, you can skip to the section where we start in photoshop.
In SketchUp I am going to create a section in a place that is visually interesting and shows the most important parts of the building. In my case, I decided to create a section in this area right here. I am going to put the view in parallel projection, and export the section as a DWG file.
Technical details in AutoCAD
Now I am going to add all of the technical details inside of AutoCAD. Since this is something the majority of you probably know how to do if you are watching a video like this, I just want to break down the steps I did here. First Ill start by organizing the main section cut line, which is the most important line of our section. I will clean it up and make sure the lineweight is thick so the cut is visible.
I also added some detail on the slab structure, detail that I did not have in my 3d model but it was easy to add in autocad. Similarly, I adjusted the lineweights of the drawings, and I will leave the thinnest lineweights to the elements that are farthest from the section line, and they will increase in lineweight when they get closer.
Next I will start to add some furniture. You can use the furniture you have at hand, or you can also download some furniture blocks from our resource library. Here we imported some desks, lamps, chairs, etc. Afterwards add the technical details, like axis, dimensions, floor numbers, etc.
And finally we just export this plan as a pdf and thats it! This is our first important part, remember that since this section is a mix of technical information along with a 3d rendered feel, we need to have a well done technical plan. Now lets create the second part, which is the 3d extrusion from the plan, just like it popped out.


Export Images from Sketchup
Now lets go back into our 3d modeling program, here I also want to speed up the process and show you the basic moves I did inside of SketchUp. First, I imported the CAD drawing onto SketchUp and started extruding the slabs and the walls. You might be wondering, steven, you already have a 3d model, why don't you use it? Well for this section I really wanted to work with a clean 3d model and I thought this was an easier option. But if your working on a program like Revit and your 3d model is well detailed, you can just use the section box tool and export the 3d model as a section.
This is the model I created after extruding it. If I show you the two three 3d models, the one I had originally with the section, and the one I created from my technical plan, you can see the difference. After I have a 3d model of my section, I will create a plane on the background and place it beneath my 3d model. I will click on the section and click on align view.
From this I will export three different views into photoshop. And these views are very important. For the first style I will go turn of the edges, put the section fill in white, section lines in white as well and the background in white. Now lets turn on the shadows adjust the shadows and save it as a scene. For the second scene put the background in black, turn off the shadows, and call this object shadows. And save it as a scene.
For the third style change the front color to black, section lines and fill to black and the background to white. Save this scene. Likewise, lets export these scenes as PNG file in a high resolution.

Photoshop Import
Then, lets open photoshop and import our files. Lets create a new file I already have one created where i first imported my plans from AutoCAD and placed a background color. I have two plans that I exported, one has the architecture and the other one has the dimensions. For my blue background this is the blue that I used for this image.
Now create a levels adjustment layer, make sure you group these DWG files and with a levels adjustment tool turn it all white. Now since I want to give more depth to the image, with the lasso tool I will select the areas that are farthest away from the section and fill them with a black color, with a very low opacity, something like this. This is what it looks like before, and after. Of course lets group our layers, we should have the base, shadows and lines.

Import Images from SKP to PS
Now lets import the images we exported from SketchUp. First we are going to import our object map, then the sun shadows and then the object shadows. I am going to group them all and lower the opacity of the group, with this I can press ctrl t and adjust the scale and placement and align it to our technical plan. Make sure this is correct!

The 3d Effect
Lets go to our section object map layer, lets change the color to white. Lets go to image, adjustments, levels and put it all white in the output levels. Make sure these are all smart objects, so we can go back at ay time. Meanwhile, lets go to our object shadows layer, we are going to turn it on, and using our object map, I am going to ctrl click on top of the layer and this will create my selection. Now I will go to the mask tool, and this will hide everything else on the layer. Now I will switch the blending mode to multiply. And here we have the first base shadows for our 3d image, although it looks cool, we have a long way to go!


Shadows
And for the sun shadows I will use the same object map contour by using ctrl click and hide the outer part of the image. Here we have the shadows applied to our image. Lets set this to normal and turn down the opacity. Next, lets duplicate the sun shadows layer, and delete the mask. Lets turn off all the other layers for now, and with the magic wand tool and selecting the color range we are going to select only the shadows. As soon as we have our selection I am going to go to the 2d group, I will create a new layer in the shadows folder, and fill it with a black color.
Now lets duplicate this shadow layer, and on the first one I am going to create a gaussian blur (179) and diffuse the shadows so it has a nice blurry effect, And lets adjust the opacity (60%)accordingly. And for the second one we are also going to apply a gaussian blur but less this time (blur 81 opacity 60) This is starting to look really cool, right? Now this image needs more shadows that makes this look more realistic and have that clay rendered effect.
So I am going to go to the section object map, right click on the layer and turn on the drop shadow effect, lower the opacity, increase the distance and adjust the angle. If I turn off and on you can see the impact of these shadows. There are some areas where we have to add some shadows in a manual manner. For example for the bottom of the slabs I will create some shadows. I will use the lasso tool to select the bottom of the slabs, now create a new layer, paint it all black, and lower the opacity to around 15%. Next, I’m going to manually adjust some shadows that could be emphasized much more. So with the lasso tool just select the bottom of the slabs and pain in a soft shadow.


Final Details
Now our building looks like it popped out of the drawing, now, lets create some contact shadows that are just small levels of detail to give more realism. Here we just create a new layer, select a soft brush, black color and a low opacity, and we are going to paint it softly where the building meets the paper. This is a very artistic part of the process where we just paint very soft shadows and it may take you some time, but you have to be patient, this is the key to this image, the shadows., as soon as you have all of these your drawing should look something like this.
This is how it looks before the contact shadows, and after. Amazing, right? Next, lets add some people and furniture to add more detail to our drawing.
First I am going to add all of the people to our drawing and place them in the same scale. You can get some people for free in the classic page pimp my drawing, or you can also visit our resource library and download different types of cutouts and illustrations. After I adjusted the scale I will place them all around the model.
I will select half of the people, and place them in a group. Next I will mask the people out and then with a levels adjustment layer make them all white, and lower the group opacity. This will make them feel like they are part of the 2d drawing. For the other half of the people I am going to create a different group, and also turn them all white, I will merge the group and add a drop shadow to the people, to make them stand out. This will have an effect of 3d maquette people that also popped out of the drawing and it gives a sense of depth to the image.
And we e are going to do the same process but with our furniture from autocad, We are going to import them adjust the scale and place them throughout our whole drawing. Details like people and furniture just add that extra level of detail that makes this image so much better. I spent a bit more time adding some extra details and this is how the section came out.


Conclusion
Now as I said at the start, this is just one of three styles of sections I teach in my master sections course that has had hundreds of students through the years. If you are interested in taking this course, learning in detail how to create this section, and also a perspective section and a more conceptual type section you can access the course through this link.


